English
 Français
 Español
 Deutsch
 Italiano
 العربية


Vous souhaitez réussir vos ponctions veineuses en toute confiance à chaque fois. Avec la bonne technique, vous augmentez votre taux de réussite dès la première tentative. détecteur de veines par projectionDes études récentes montrent que la précision du repérage des veines atteint 87,1 %, contre 46,8 % pour la ponction veineuse classique. En préparant le patient avec soin, en veillant à son confort et à la circulation sanguine, vous réduisez la douleur et l'anxiété. Cette approche simplifie l'insertion de l'aiguille et la pose du garrot, faisant de vous un phlébotomiste de référence. La technologie infrarouge contribue à informer les patients et améliore l'efficacité clinique.
Les patients font état de moins de douleur et d'anxiété lors des ponctions veineuses.
Type de preuve | Statistique | Impact |
|---|---|---|
Taux de réussite à la première tentative | Réduction de 77,5 % des taux de défaillance | Améliore le confort du patient |
Durée de la procédure | Réduction de 6,06 min à 3,4 min | Améliore l'efficacité du flux de travail |
taux d'infiltration | diminution de 61,4 % | Rationalise le flux de travail clinique |
Allumez et réglez votre appareil pour une localisation précise des veines, et appliquez ces conseils incontournables pour des résultats exceptionnels.
Points clés à retenir
Augmentez le taux de réussite de vos ponctions veineuses en utilisant un détecteur de veines à projection, ce qui augmente la précision à 87,1 %.
Préparez votre patient en passant en revue ses antécédents médicaux et en optimisant son confort afin de réduire son anxiété pendant les interventions.
Assurez-vous d'un éclairage adéquat et d'un étalonnage correct de l'appareil pour une visualisation claire des veines, ce qui améliorera votre efficacité et votre précision.
Associez la technologie de projection à la palpation traditionnelle pour améliorer votre confiance et vos taux de réussite dans les cas difficiles.
Nettoyez et entretenez régulièrement votre détecteur de veines afin de garantir son efficacité et sa fiabilité pour chaque patient.
Préparation du patient et de l'environnement
Examen des antécédents médicaux
On commence par examiner les antécédents médicaux du patient. Cette étape permet d'identifier d'éventuels problèmes d'accès vasculaire antérieurs, tels que des veines difficiles à ponctionner, des troubles de la coagulation ou des tentatives de ponction veineuse répétées. On recherche également des informations sur la déshydratation, l'obésité ou les maladies chroniques. Ces détails orientent la démarche et aident à choisir le site d'insertion le plus approprié pour la procédure. La connaissance des antécédents médicaux du patient améliore la prise en charge et réduit les complications.
Retirez vos vêtements et bijoux.
Avant d'utiliser le détecteur de veines par projection, demandez au patient de retirer ses vêtements et bijoux encombrants de la zone à examiner. Ce simple geste améliore la précision et facilite la visualisation des veines. Vous évitez ainsi les interférences des manches, montres ou bracelets, qui peuvent bloquer la lumière de l'appareil ou créer des ombres. Retirer ces objets vous permet également de conserver un espace de travail propre et dégagé.
Retirer les vêtements encombrants et les bijoux :
Améliore la précision de la visualisation des veines
Empêche les interférences entre appareils
Améliore le confort du patient
Optimiser l'éclairage
Un éclairage adéquat est essentiel pour une utilisation efficace d'un détecteur de veines par projection. Il convient de régler la luminosité de la pièce à un niveau confortable, en évitant les éclairages zénithaux agressifs. De nombreux appareils proposent des fonctionnalités permettant de s'adapter à différents environnements cliniques.
Fonctionnalité | Description |
|---|---|
Réglages de luminosité | Quatre niveaux de luminosité réglables pour une visibilité optimale. |
Mode lumière verte | Améliore la visibilité sur les peaux plus foncées. |
Mode pédiatrique | Protège les yeux du patient pendant l'utilisation. |
Détection intelligente de profondeur | Améliore la précision de la localisation des veines à différentes profondeurs. |
Adaptabilité des couleurs | S'adapte aux différentes carnations pour une meilleure détection des veines. |
Vous choisissez un appareil utilisant la lumière proche infrarouge, adapté à toutes les carnations. Cette approche optimise la visibilité des veines et garantit des soins de qualité aux patients.
Positionnez le bras pour l'accès veineux
Vous positionnez le bras du patient confortablement en dessous du niveau du cœur. Cette technique favorise la circulation sanguine et rend la veine plus visible. Vous veillez à ce que la zone soit bien éclairée, ce qui optimise le fonctionnement de l'appareil. Un bon positionnement améliore non seulement la visibilité de la veine, mais aussi le confort du patient et réduit son anxiété. Vous perfectionnez votre technique de repérage des veines en pratiquant ces étapes à chaque intervention.
Configuration du détecteur de veines par projection

Nettoyer et calibrer l'appareil
Pour optimiser le fonctionnement de votre détecteur de veines par projection, suivez une routine simple. Nettoyez régulièrement la surface et les optiques de l'appareil pour éliminer la poussière et les saletés. Cette étape prévient la distorsion de l'image et garantit une projection nette. Calibrez l'appareil selon un calendrier précis. Le calibrage assure l'alignement de l'image projetée avec l'emplacement réel de la veine. Vous évitez ainsi les erreurs et améliorez votre taux de réussite dès la première tentative. Voici une liste de contrôle rapide des bonnes pratiques :
Nettoyez la surface et les optiques de l'appareil après chaque utilisation.
Calibrez l'appareil conformément aux instructions du fabricant.
Avant chaque intervention, inspectez les lieux afin de déceler tout dommage visible.
Un appareil propre et calibré vous aide à trouver rapidement les veines, notamment lorsque vous devez poser un garrot et travailler efficacement.
Vérifier les matériaux et la polyvalence de l'appareil
Vous recherchez des dispositifs de localisation des veines adaptés à vos besoins cliniques. Le choix des matériaux et la conception font toute la différence au quotidien. La portabilité permet de déplacer le dispositif d'une chambre à l'autre. Le support ajustable facilite son positionnement pour différentes interventions. Les dispositifs de prévention des infections protègent à la fois vous et vos patients. La technologie proche infrarouge améliore la précision pour toutes les carnations. L'imagerie en temps réel accélère le processus, vous permettant ainsi de poser le garrot et d'insérer l'aiguille en toute confiance.
Aspect de conception/de fonctionnalité | Contribution à la polyvalence et à la durabilité |
|---|---|
Portabilité | Permet une utilisation dans divers endroits, améliorant ainsi l'adaptabilité en milieu clinique. |
Montage réglable | Permet un positionnement flexible, ce qui le rend adapté à différentes procédures. |
Fonctionnalités de contrôle des infections | Essentiel pour maintenir l'hygiène et la sécurité des patients, et prolonger la durée de vie des dispositifs. |
Technologie du proche infrarouge | Améliore la précision et la facilité d'utilisation dans diverses applications médicales. |
Imagerie en temps réel | Permet une cartographie veineuse plus rapide et plus précise, améliorant ainsi l'efficacité globale. |
Choisissez un appareil adapté à votre flux de travail et qui soutient vos objectifs cliniques.
S'assurer que l'appareil est prêt
Pour éviter les retards, vérifiez que votre appareil est prêt avant chaque intervention. Assurez-vous que la batterie est chargée et que tous les câbles sont branchés. Placez le moniteur dans votre champ de vision afin de ne pas avoir à quitter la zone des yeux lors de la pose du garrot. Organisez tous les composants, y compris les connecteurs de valve compatibles, pour éviter de les chercher pendant l'intervention. Utilisez des accessoires de couleurs contrastées pour éviter toute confusion. Un équipement bien préparé vous permet de vous concentrer sur les soins au patient et réduit les risques d'erreurs.
Conseil: Positionnez toujours votre écran et votre table de manière à pouvoir voir l'image projetée pendant la pose du garrot et la ponction veineuse.
Un équipement fiable renforce votre confiance et vous aide à obtenir de meilleurs résultats pour chaque patient.
Utilisation étape par étape du détecteur de veines

Appliquer le garrot
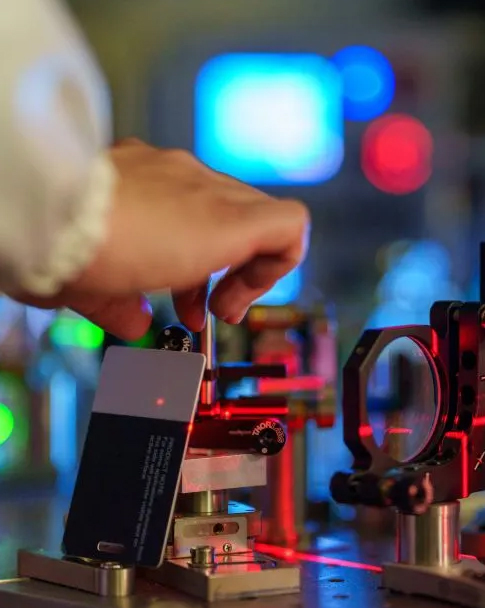
On commence par appliquer un garrot au-dessus du site visé. Cette étape améliore la visibilité de la veine et facilite son accès. Le garrot provoque le remplissage de la veine par le sang, ce qui facilite… détecteur de veines à projection infrarouge L'image sera plus nette. Le garrot doit être bien ajusté, sans être trop serré. Cette méthode augmente les chances de réussite dès la première tentative et réduit l'inconfort du patient.
Placez le garrot environ 7 à 10 centimètres au-dessus du site que vous prévoyez d'utiliser.
Vérifiez que la main du patient est détendue et que son bras est soutenu.
Ne laissez pas le garrot en place pendant plus d'une minute afin d'éviter les complications.
Conseil: L'application correcte du garrot permet de faire ressortir la veine, ce qui est essentiel pour un repérage précis à l'aide du détecteur de veines.
Utilisation et réglage du détecteur de veines
Allumez le détecteur de veines par projection et positionnez-le sur le bras du patient. Ajustez l'appareil pour que l'image projetée soit nette et précise. Les détecteurs de veines modernes utilisent une technologie avancée permettant de visualiser les veines superficielles et profondes. Il peut être nécessaire de modifier les paramètres de profondeur ou de luminosité en fonction du teint et de l'anatomie du patient.
Fonctionnalité | Description |
|---|---|
Technologie de détection des veines | L'imagerie NIR et la transillumination LED répondent à différents besoins des patients. |
Profondeur et clarté | Les réglages de profondeur ajustables vous permettent de visualiser les veines à différents niveaux. |
Compatibilité avec le teint | Ces appareils fonctionnent sur de nombreuses carnations afin d'améliorer la précision de la détection. |
Fonctionnement facile | Des commandes intuitives rendent le processus efficace et fluide. |
Déplacez lentement l'appareil sur la zone à examiner et observez attentivement pour obtenir la meilleure image. Si vous constatez des ombres ou des lignes floues, ajustez l'angle ou les paramètres. Cette technique vous aide à trouver la veine la plus appropriée pour un prélèvement sanguin ou la pose d'une perfusion intraveineuse.
Identifier et marquer la veine
Vous observez l'image projetée et repérez la veine à utiliser. Le visualiseur de veines projeté affiche le réseau veineux sur la peau, facilitant ainsi le choix du point de ponction. Vous pouvez utiliser un marqueur cutané pour délimiter la veine ou marquer le site d'insertion. Cette étape réduit le risque de manquer la veine lors de la ponction.
Utilisez l'appareil pour segmenter la surface de la peau et mettre en évidence la veine.
Marquez la zone délicatement pour éviter les bavures ou toute confusion sur le site.
Vérifiez attentivement l'image pour confirmer l'emplacement et la profondeur de la veine.
Sachez que même avec des appareils performants, certains utilisateurs peuvent manquer la veine s'ils ne bénéficient pas d'une formation adéquate. La pratique et le souci du détail vous aideront à éviter les erreurs courantes et à améliorer vos chances de réussite.
Sélectionner le site d'insertion optimal
Vous choisissez le meilleur site d'insertion en fonction des informations fournies par le détecteur de veines. Recherchez une veine droite et visible, éloignée d'une articulation ou d'une cicatrice. L'appareil vous aide à comparer différentes veines et à sélectionner celle qui vous offrira le meilleur résultat. Évitez les veines trop petites, trop profondes ou difficiles d'accès.
Engagez le dialogue avec le patient pour réduire son anxiété et obtenir sa coopération.
Positionnez le bras pour une visibilité maximale des veines.
Appliquer le garrot pour augmenter le remplissage veineux.
Utilisez le détecteur de veines pour ajuster et visualiser les veines.
Marquez le meilleur site pour la ponction veineuse.
Suivre la technique standard de ponction veineuse après le marquage.
Nettoyez et rangez le détecteur de veines après utilisation.
Note: L'utilisation d'un détecteur de veines à projection en suivant ces étapes améliore la précision et l'efficacité par rapport aux méthodes traditionnelles. Vous augmentez ainsi vos chances de réussir le prélèvement sanguin dès la première tentative et offrez une meilleure expérience à votre patient.
Conseils cliniques et dépannage
Associer à la palpation
Vous pouvez améliorer la réussite de vos ponctions veineuses en combinant la technologie de projection à la palpation traditionnelle. L'appareil vous aide à visualiser la veine, tandis que le toucher confirme son emplacement et sa qualité. Cette double approche renforce votre confiance et votre précision, notamment face à des cas complexes.
Type de preuve | Description |
|---|---|
Amélioration des taux de réussite | L'association de la technologie de projection des veines aux techniques de palpation traditionnelles augmente considérablement les chances de réussite dès la première tentative de ponction veineuse. |
Réduction des tentatives infructueuses | L'intégration de ces méthodes permet de réduire le nombre de tentatives de ponction veineuse infructueuses, notamment chez les patients présentant un accès veineux difficile. |
De meilleurs résultats pour les patients | Cette combinaison permet d'améliorer le confort du patient et les résultats globaux lors des ponctions veineuses. |
Utiliser la gravité et le réchauffement
Vous pouvez rendre les veines plus visibles en utilisant la gravité et la chaleur. Demandez au patient de laisser pendre son bras pendant une minute. Cela augmente le flux sanguin et fait ressortir la veine. Vous pouvez également appliquer une compresse chaude pendant quelques minutes. La chaleur contribue à dilater les vaisseaux, les rendant plus faciles à repérer et à examiner.
Traiter les cas difficiles
Certains patients présentent des difficultés particulières. Pour les enfants, les personnes obèses ou déshydratées, il peut être nécessaire d'adapter votre approche. Voici quelques stratégies de dépannage à considérer :
Des appareils spécialisés de détection des veines pédiatriques sont indispensables en raison de la fragilité des veines chez les nourrissons.
Des technologies telles que la transillumination (LED), le proche infrarouge (NIR) ou les ultrasons sont recommandées pour améliorer les taux de réussite des ponctions veineuses dans les cas difficiles.
La déshydratation et l'obésité compliquent l'accès aux veines, nécessitant le recours à des technologies de pointe pour la localisation des veines.
Si votre appareil n'affiche pas le symbole de veine verte, éteignez-le puis redémarrez-le. Chargez la batterie pendant 2 à 5 heures si nécessaire. En cas d'écran d'erreur, redémarrez l'appareil ou contactez l'assistance. Suivez toujours les instructions d'alerte concernant les problèmes de batterie.
Description du problème | Solution recommandée |
|---|---|
L'appareil ne projette pas l'affichage de la veine verte | Éteignez l'appareil, puis rallumez-le. Si le problème persiste, chargez la batterie pendant 2 à 5 heures. |
Un écran d'erreur apparaît | Éteignez l'appareil, puis rallumez-le. Si le problème persiste, contactez l'assistance AccuVein. |
La batterie doit être rechargée ou remplacée. | Suivez les instructions d'alerte pour charger ou remplacer la batterie selon les besoins. |
Communiquer avec les patients
Une communication claire avec votre patient améliore à la fois le succès et la satisfaction. Expliquez chaque étape et montrez-lui l'image projetée si possible. Cela réduit l'anxiété et instaure un climat de confiance, notamment chez les enfants et leurs parents.
Métrique | Impact sur l'expérience du patient |
|---|---|
Taux de réussite à la première tentative | Des taux de réussite plus élevés entraînent une réduction de l'anxiété et de l'inconfort chez les patients. |
Nombre de tentatives de crevaison | Moins de tentatives minimisent les traumatismes et améliorent la satisfaction globale. |
confort du patient | Une meilleure visualisation des veines améliore le confort pendant les interventions. |
Les appareils portables contribuent à réduire l'anxiété lors de la pose d'une voie veineuse.
Le guidage visuel vous permet de sélectionner les veines appropriées, améliorant ainsi l'expérience globale.
Cette technologie sert d'outil de communication, vous permettant d'expliquer visuellement les procédures aux patients et à leurs parents.
Conseil: Utilisez ces conseils cliniques pour créer une expérience positive et obtenir de meilleurs résultats pour chaque patient.
Entretien et maintenance du détecteur de veines
Nettoyer et désinfecter régulièrement
Vous protégez vos patients et votre matériel en nettoyant et en désinfectant votre appareil après chaque utilisation. Utilisez un chiffon doux non pelucheux et un désinfectant homologué. Évitez les produits chimiques agressifs qui pourraient endommager les surfaces sensibles. Portez une attention particulière à la lentille et à la zone de projection. Ces parties accumulent rapidement la poussière et les traces de doigts. Le nettoyage prévient la distorsion de l'image et réduit le risque de contamination croisée. Suivez toujours les instructions de nettoyage du fabricant pour un résultat optimal.
Conseil: Pensez à programmer un rappel pour nettoyer votre appareil à la fin de chaque quart de travail. La régularité est la clé pour garder votre équipement en bon état de fonctionnement.
Calibrer et inspecter
Pour garantir la précision de vos mesures, il est essentiel de calibrer régulièrement votre appareil. Le calibrage permet d'aligner l'image projetée avec l'emplacement réel de la veine. La plupart des appareils sont fournis avec un outil ou un logiciel de calibrage simple. Consultez le manuel d'utilisation pour obtenir des instructions détaillées. Avant chaque utilisation, vérifiez que votre appareil ne présente aucune fissure, pièce desserrée ou problème de batterie. La détection précoce des problèmes vous permet d'éviter les interruptions pendant les procédures.
Tâche de maintenance | Fréquence | Avantage |
|---|---|---|
Étalonnage | Hebdomadaire ou au besoin | Assure une projection précise |
Inspection visuelle | Avant chaque utilisation | Détecte les dommages précocement |
Vérification de la batterie | Tous les jours | Empêche les arrêts inattendus |
Conserver en toute sécurité
Prolongez la durée de vie de votre appareil en le rangeant dans un endroit propre et sec. Utilisez l'étui de protection fourni par le fabricant. Évitez d'exposer l'appareil à la lumière directe du soleil, à l'humidité et aux températures extrêmes. Rangez tous les accessoires ensemble pour éviter toute perte ou dommage. Un rangement adéquat réduit les risques de chute accidentelle ou de contamination.
Note: Des procédures de stockage sécurisées vous aident à maintenir les performances et la fiabilité de l'appareil pour chaque patient.
Un entretien régulier garantit la précision et la fiabilité de votre appareil de projection. En suivant ces quelques étapes simples, vous optimisez les résultats de chaque procédure d'accès veineux.
Vous obtiendrez de meilleurs résultats en préparant votre environnement, en utilisant une technique appropriée et en perfectionnant constamment vos compétences. La formation continue vous aidera à interpréter les images et à sélectionner les veines avec assurance.
La pratique structurée permet d'obtenir des taux de réussite plus élevés et moins d'échecs.
Les ateliers et les cours en ligne vous aident à éviter les erreurs et la confusion.
Les progrès technologiques récents améliorent les résultats cliniques :
Aspect d'amélioration | Description |
|---|---|
Taux de réussite au premier coup | Augmentation de 100% |
Réduction du nombre de cathéters PICC | Diminutions de plus de 30 % |
Satisfaction des patients | Augmentation de 100% |
Continuez à utiliser les nouveaux outils et partagez votre expérience avec vos collègues afin d'offrir les meilleurs soins à chaque patient.
FAQ
Comment fonctionne un détecteur de veines par projection ?
On utilise un appareil de projection veineuse pour localiser les veines. Cet appareil projette une lumière proche infrarouge sur la peau. Les veines absorbent cette lumière, ce qui permet à l'appareil de projeter une image de leur réseau veineux sur la surface de la peau.
Peut-on utiliser un détecteur de veines sur tous les types de peau ?
La plupart des détecteurs de veines modernes sont compatibles avec tous les types de peau. Les appareils dotés d'une adaptation des couleurs et de réglages de luminosité améliorent la visibilité sur les peaux foncées. Vérifiez toujours la compatibilité de votre appareil avec les fonctionnalités indiquées.
Que faire si l'image de l'appareil est floue ?
Ajustez la luminosité ou la profondeur de champ. Nettoyez l'objectif et repositionnez l'appareil. Si l'image reste floue, vérifiez l'état de la batterie ou recalibrez l'appareil.
Conseil: Suivez toujours le guide de dépannage du fabricant.
Un détecteur de veines est-il sans danger pour les patients pédiatriques ?
Utilisez le mode pédiatrique ou les fonctions de protection pour assurer la sécurité des enfants. Les appareils dotés d'une protection oculaire et d'un éclairage doux contribuent à éviter tout inconfort.
Fonctionnalité pédiatrique | Avantage |
|---|---|
Protection oculaire | Réduit l'irritation |
Lumière douce | Augmente le confort |

 IPv6 RÉSEAU PRIS EN CHARGE