 English
 Français
 Español
 Deutsch
 Italiano
 العربية


Tél
:+86-755-86961139
E-mail
:sales@vivo-light.com

Pour obtenir des images nettes des veines avec votredétecteur de veines par projection, Il est essentiel de suivre les bonnes pratiques. Un paramétrage correct de l'appareil et le confort du patient améliorent considérablement la qualité d'image. En respectant un protocole précis et en maîtrisant l'imagerie HD et les contrôles en temps réel, vous obtiendrez des résultats constants.
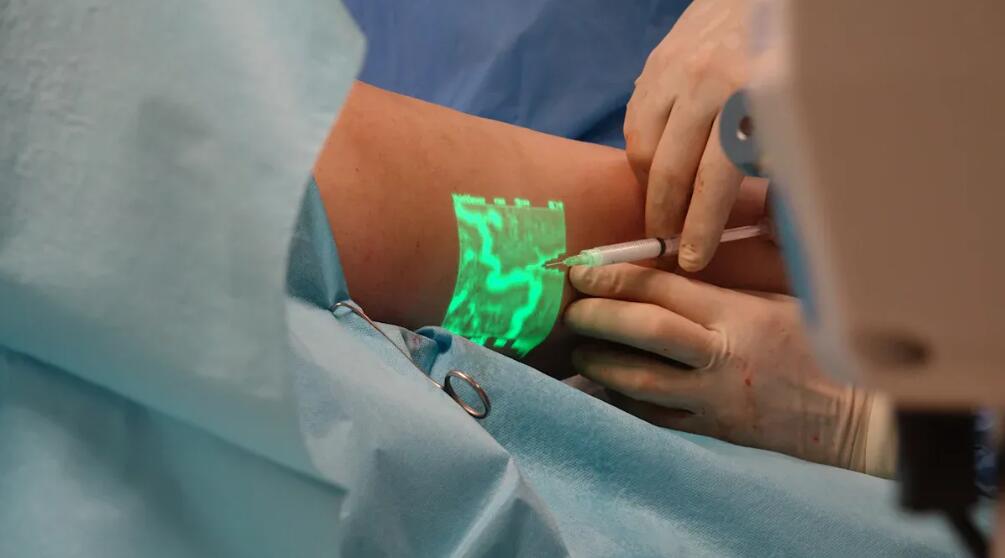
Les recherches indiquent que l'utilisation d'appareils de visualisation des veines commevivolightpermet aux infirmières de localiser les veines du premier coup, réduisant ainsi l'inconfort du patient.
| Métrique | Valeur |
|---|---|
| Accord sur la vérité fondamentale | 97,7 % (p < .001) |
| Sensibilité de l'appareil | 94% |

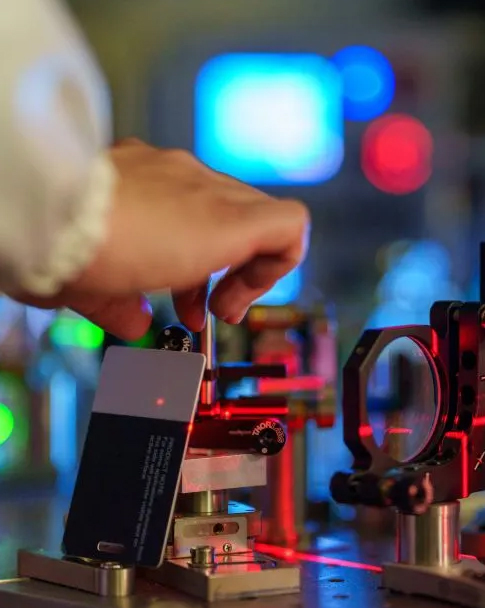
Appareil de détection des veines par projection infrarouge Vivolight V800P
Veillez à toujours nettoyer votre détecteur de veines à projection. La présence de poussière ou d'empreintes digitales sur la lentille peut rendre l'image floue et les veines plus difficiles à distinguer. Utilisez un chiffon doux non pelucheux pour le nettoyer avant chaque utilisation. Un appareil propre vous garantit une image optimale.
L'étalonnage est également primordial. Le fabricant recommande d'étalonner régulièrement l'appareil afin de garantir une projection et une visualisation des veines optimales. Un étalonnage correct permet d'obtenir une image parfaitement alignée sur les veines réelles, évitant ainsi les erreurs et assurant la sécurité des patients.
Conseil : Programmez un rappel pour vérifier l’étalonnage au début de chaque quart de travail ou après avoir déplacé l’appareil.
Vérifiez le niveau de la batterie avant de commencer. Si la batterie est faible, l'appareil risque de s'éteindre ou de voir sa luminosité diminuer. Rechargez toujours l'appareil avant votre prise de service. Surveillez l'indicateur de batterie.
La source lumineuse est également importante. De nombreux appareils de visualisation des veines par projection permettent de régler la luminosité. Vous pouvez l'adapter aux besoins de chaque patient. Par exemple :
| Population de patients | Avantage de l'intensité lumineuse réglable |
|---|---|
| Pédiatrique | Permet de mieux visualiser les petites veines et de les trouver plus rapidement. |
| Gériatrie | Permet de localiser les veines difficiles à voir et réduit les problèmes liés à l'insertion du cathéter. |
Choisissez un appareil émettant dans l'infrarouge à une longueur d'onde d'au moins 850 nm. Cela vous permettra de mieux visualiser les veines et d'obtenir des images plus nettes. Les appareils légers et faciles à transporter sont un atout. Vous pourrez les utiliser dans de nombreux contextes. Les détecteurs de veines portables vous aident à localiser rapidement les veines, même difficiles à voir. Vous pouvez les utiliser aux urgences, dans les ambulances ou au chevet du patient. Cela simplifie votre travail et vous permet de respecter les bonnes pratiques en toutes circonstances.
Conseil : Éteignez ou tamisez les écrans ou moniteurs situés à proximité du patient. Cela réduit l’éblouissement et facilite la concentration de vos yeux sur l’image projetée des veines.
Il est essentiel de toujours mettre le patient à l'aise avant de commencer. Demandez-lui de détendre son bras ou sa jambe sur une surface plane. Si nécessaire, soutenez le membre avec un oreiller ou une serviette roulée. Cela permet de stabiliser la zone et d'éviter tout mouvement pendant l'examen. Un patient détendu et en confiance vous permettra de localiser les veines plus rapidement et plus facilement.
| Description des preuves | Impact sur le confort du patient et le taux de réussite |
|---|---|
| Les appareils de visualisation des veines par projection réduisent la douleur et l'anxiété des patients. | Des taux de réussite plus élevés dès la première tentative et une meilleure expérience lors des ponctions veineuses. |
| La technologie de visualisation des veines réduit de 52 % le nombre de piqûres à l'aiguille. | Moins de stress pour les patients et une peur des aiguilles réduite. |
| Une localisation plus rapide des veines réduit le stress tant pour les patients que pour les professionnels de santé. | Augmente les chances de réussite de la ponction veineuse dès la première tentative. |
Il est essentiel de toujours suivre les bonnes pratiques en matière de préparation du patient et de l'environnement. Cela permet d'obtenir des images nettes et améliore l'expérience tant pour vous que pour votre patient.
Pour obtenir des images nettes des veines, maintenez votre appareil de projection à la bonne distance et au bon angle. La plupart des appareils fonctionnent de manière optimale à environ 30 centimètres de la peau. Cette distance permet une mise au point précise et une image nette. Si vous tenez l'appareil trop près ou trop loin, les veines risquent d'apparaître floues ou étirées.
Il est également important de faire attention à l'angle de prise en main. Maintenez l'appareil bien droit au-dessus de la zone à scanner. Si vous inclinez l'appareil, l'image risque d'être déformée. Déplacez-le lentement et ajustez l'angle jusqu'à ce que les veines soient clairement visibles. En suivant ces bonnes pratiques, vous localiserez les veines plus rapidement et réduirez les erreurs.
Conseil : Marquez la distance idéale sur votre appareil avec un petit autocollant. Cela vous aidera à vous souvenir où le tenir à chaque fois.
Les mouvements peuvent rendre difficile l'obtention d'une image nette. Si le patient bouge ou si vous déplacez trop l'appareil, les veines peuvent apparaître floues ou instables sur l'écran. Demandez au patient de rester immobile et de détendre son bras ou sa jambe. Au besoin, soutenez le membre avec un oreiller ou une serviette roulée.
Les détecteurs de veines modernes utilisent des lasers proche infrarouge (NIR) à haute vitesse et une fréquence de rafraîchissement d'image élevée. Ces caractéristiques permettent de conserver une image nette, même en cas de léger mouvement. Le tableau ci-dessous illustre leur fonctionnement :
| Fonctionnalité | Impact sur la qualité d'image |
|---|---|
| Laser NIR à haute vitesse | Permet un traitement d'image net et une numérisation rapide. |
| Taux de rafraîchissement d'image rapides | Prévient les décalages ou les distorsions, en s'adaptant aux mouvements du patient. |
Il est important de maintenir l'appareil et le patient aussi immobiles que possible. Cela facilite le repérage de la veine et augmente les chances de réussite.
Bien préparer sa peau permet d'obtenir une image optimale. Nettoyez la zone avec une lingette imbibée d'alcool pour éliminer les traces de sébum, de lotion ou d'impuretés. Séchez votre peau avant d'utiliser l'appareil. Une peau brillante ou grasse peut réfléchir la lumière et rendre les veines plus difficiles à distinguer. Si votre peau est très sèche, vous pouvez appliquer une petite quantité de crème hydratante, en veillant à ce qu'elle soit complètement absorbée avant la numérisation.
Il est également conseillé de vérifier la présence de tatouages ou de cicatrices. Ceux-ci peuvent bloquer la lumière infrarouge et rendre les veines plus difficiles à visualiser. Dans la mesure du possible, essayez de scanner une zone où la peau est saine et nette.
Remarque : Une bonne préparation cutanée fait partie des bonnes pratiques d’utilisation d’un détecteur de veines par projection. Elle permet d’obtenir des résultats précis et garantit la sécurité du patient.
Il arrive parfois que l'image de votre détecteur de veines par projection soit floue ou peu lumineuse. Ces problèmes peuvent rendre la localisation des veines difficile. Vous pouvez résoudre la plupart de ces problèmes en vérifiant quelques points clés :
Conseil : Essayez de tamiser la lumière et de fermer les stores. Pour une image optimale, tenez l’appareil à la distance et à l’angle recommandés.
Si l'image reste floue, nettoyez la lentille et vérifiez qu'elle n'est pas sale. Assurez-vous que l'appareil est calibré. Vous pouvez également demander au patient de rester immobile et de détendre son membre. Cela permettra à l'appareil de produire une image stable et nette.
Vous remarquerez peut-être que les détecteurs de veines fonctionnent différemment selon le teint. Sur une peau foncée ou réfléchissante, les veines peuvent parfois être plus difficiles à voir. L'appareil peut nécessiter un rapport signal/bruit (RSB) plus élevé pour afficher des images nettes. Le RSB mesure la capacité de l'appareil à distinguer l'image de la veine du bruit de fond. Un RSB plus élevé offre une image plus nette.
Des études cliniques montrent que les taux de réussite à la première tentative peuvent varier en fonction de la couleur de la peau :
| Couleur de peau | Taux de réussite à la première tentative | Probabilité de succès comparée à celle des personnes à la peau claire |
|---|---|---|
| Peau claire | 75% | 1,00 (groupe de référence) |
| Peau foncée/moyenne | 73% | 0,38 |
Vous pouvez améliorer les résultats en ajustant la luminosité de votre appareil. Essayez de scanner sous différents angles pour réduire les reflets. Nettoyez et séchez la peau avant de scanner. Si le problème persiste, déplacez-vous dans une zone moins réfléchissante ou avec moins de tatouages.
Remarque : Avec de la pratique et de la patience, vous obtiendrez de meilleurs résultats sur tous les types de peau. Essayez différents réglages jusqu’à trouver celui qui vous convient le mieux.
Prendre soin de votre appareil de visualisation des veines par projection vous permet d'obtenir des images nettes. Un entretien régulier prolonge sa durée de vie et améliore son fonctionnement. En suivant une routine simple, vous pouvez prévenir de nombreux problèmes.
Il est conseillé de nettoyer votre appareil après chaque utilisation. La poussière, les traces de doigts et les taches peuvent obstruer l'objectif et dégrader la qualité de l'image. Utilisez un chiffon doux non pelucheux pour nettoyer l'objectif et le boîtier. N'utilisez ni produits chimiques agressifs ni objets abrasifs, car ils risqueraient de rayer la surface.
Examinez régulièrement votre appareil. Vérifiez la présence de fissures, de pièces desserrées ou de signes de dommages. Inspectez le compartiment de la batterie et le port de charge. Si vous constatez des dommages, signalez-le immédiatement. Un contrôle rapide peut éviter des problèmes plus importants par la suite.
Liste de contrôle pour le nettoyage et l'inspection :
Conseil : Programmez un rappel pour vérifier votre appareil au début de chaque quart de travail. Cette habitude vous permettra de garder votre appareil prêt à l’emploi.
Les fabricants proposent parfois des mises à jour logicielles ou micrologicielles. Ces mises à jour corrigent les problèmes et ajoutent de nouvelles fonctionnalités. Il est conseillé de vérifier les mises à jour tous les mois. Un nouveau logiciel permet à votre appareil de mieux fonctionner et d'offrir des images plus nettes.
Suivez les instructions de votre manuel d'utilisation pour mettre à jour votre appareil. La plupart des mises à jour ne prennent que quelques minutes. Utilisez toujours le site web ou l'application officiels pour obtenir les mises à jour. Cela protège votre appareil contre les virus.
| Tâche de maintenance | À quelle fréquence? | Pourquoi c'est important |
|---|---|---|
| Nettoyer et inspecter | Après chaque utilisation | Prévient les problèmes d'image |
| Mises à jour logicielles | Chaque mois | Améliore les performances et la sécurité |
Remarque : Un entretien régulier vous fait gagner du temps et vous aide à prodiguer de meilleurs soins à vos patients.
Vous pouvez obtenir des images veineuses nettes en suivant les bonnes pratiques. Nettoyez votre appareil avant utilisation. Assurez-vous que le patient est prêt et confortable. Utilisez la technique appropriée à chaque fois. Résolvez rapidement les problèmes et entretenez régulièrement votre appareil. Cela vous permettra de travailler efficacement et durablement. Des études cliniques ont mis en évidence certains critères importants :
| Aspect clé | Meilleures pratiques |
|---|---|
| Technologie de projection | Choisir des images haute résolution pour les patients à la peau plus foncée. |
| Caractéristiques | La luminosité réglable, les modes de couleur et les indicateurs de profondeur vous aident à mieux travailler. |
| Facilité d'utilisation | Choisissez des appareils faciles à utiliser. |
| Autonomie de la batterie | L'autonomie prolongée de la batterie vous permet de travailler sans interruption. |
| Portabilité | Les appareils légers sont faciles à transporter d'une pièce à l'autre. |
| Prix et assistance | Une bonne garantie et un bon support technique rendent l'appareil plus fiable. |
Suivez toujours les mêmes étapes pour que chaque patient se sente en sécurité et à l'aise.
Il est conseillé de calibrer votre appareil au début de chaque quart de travail ou après l'avoir déplacé. Un étalonnage régulier permet d'obtenir des images veineuses précises et nettes.
Oui, on peut utiliser un détecteur de veines à projection chez les enfants. De nombreux appareils ont une luminosité réglable. Cette fonction permet de visualiser les petites veines chez les jeunes patients sans les gêner.
Commencez par nettoyer l'objectif avec un chiffon doux. Vérifiez la distance et l'angle de prise de vue. Assurez-vous que la batterie est chargée. Ces étapes permettent généralement de résoudre les problèmes d'images floues.
Vous pouvez utiliser sans risque les détecteurs de veines par projection sur tous les types de peau. Ajustez la luminosité et l'angle pour un résultat optimal. Avec de la pratique, vous obtiendrez des images nettes aussi bien sur peau claire que foncée.
Laisser un message
Numériser vers WhatsApp :


 IPv6 RÉSEAU PRIS EN CHARGE